PlanStudio now automatically places final exits on all site plan evacuation routes.
All new final exits and Assembly areas are now assigned default tags to improve the experience of the new manual final exit route editor.
For existing site plans, your existing settings are preserved and you can still place final exits manually while in Legacy mode so this change does not disrupt existing work. A warning card will prompt you to migrate to the new tooling. During migration, PlanStudio removes any invalid final exits and automatically places missing ones.
Selecting a final exit tag on a site plan lets you whitelist which floors in the building the evacuation route serves. Use Allow All for every floor, or whitelist to use only selected floors.
When selecting assembly areas, a building whitelist now lets you choose which buildings can use that assembly area.
The four existing final exit modes in the diagram editor have been simplified to Automatic and Manual:
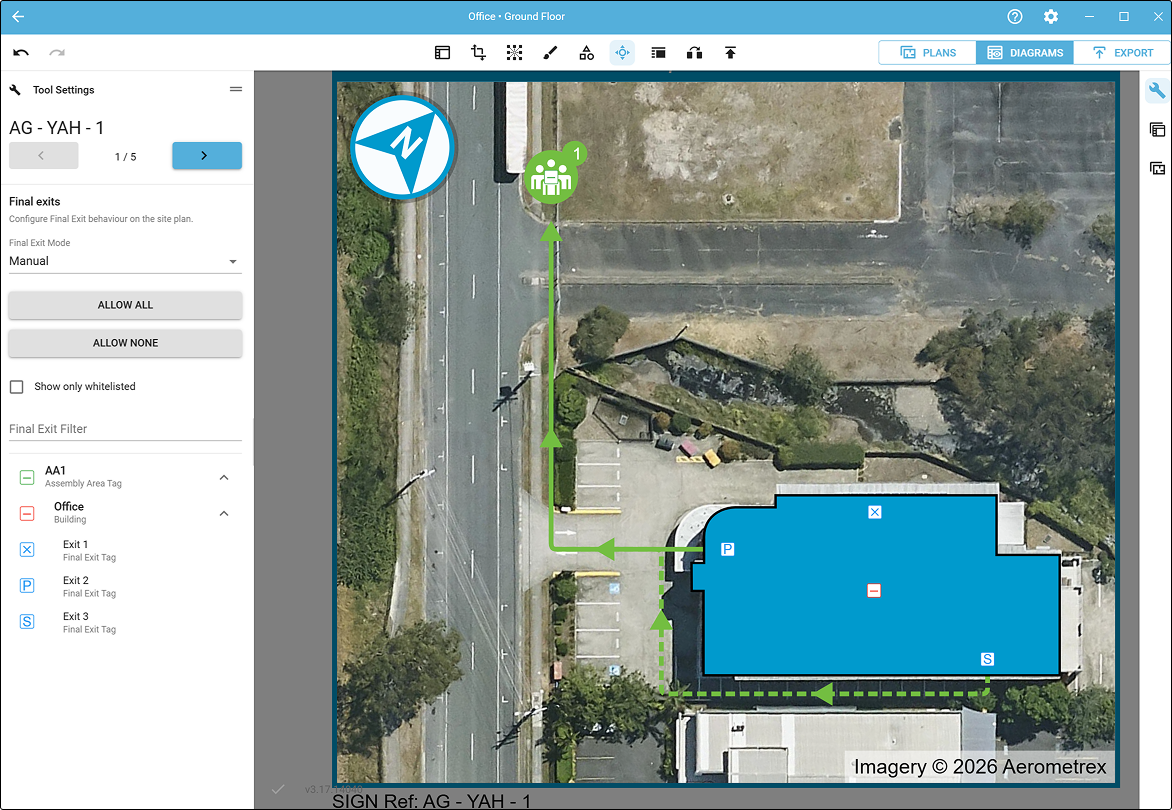
Automatic: uses the assembly area and final exit whitelists to generate site plan evacuation paths automatically, with higher accuracy.
Manual: lets you fully customise site plan evacuation paths. You can show the whitelisted options for your building or edit all possible paths. Click an assembly area to turn on all paths to it, click a building to turn on all paths from it, or click a final exit to control each evacuation route individually. Each route can be set to:
[P] Primary path
[S] Secondary path
[X] Off
[C] Closest route to an assembly area
Final exit settings can now be cloned in the diagram editor.
Click an Assembly area, Fixed, Zoned, or Leader line icon to select it.
In the Tool Settings panel, click the eye icon to hide or unhide the selected icon(s).
Hidden icons appear blue while in the layout editor.
Updated icon layouts.
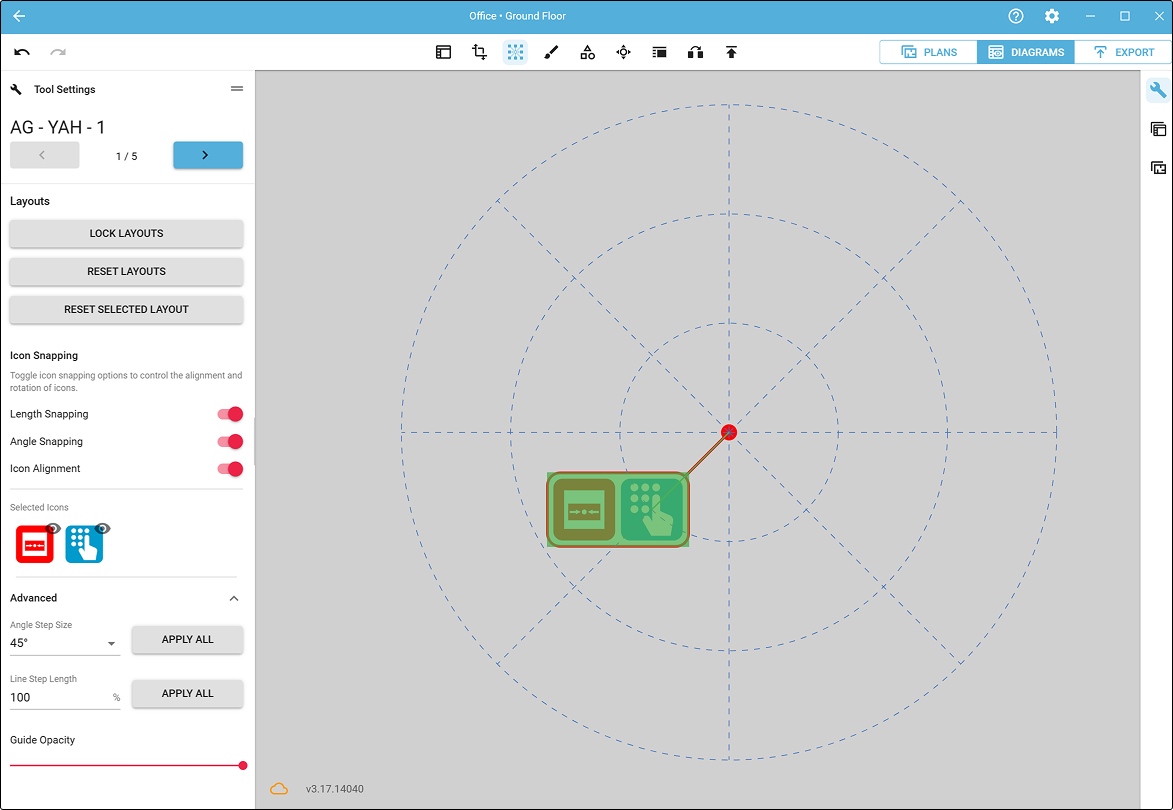
Icon layouts are now edited by clicking the icon group to rotate it, while the leader line angle is set by dragging the icon into position using the new snapping settings in the tool panel.
When changing leader line angle, a new guide shows what the leader line snaps to. You can edit the available angles, the leader line length, and the guide opacity in advanced settings.
Length snapping: snaps icons to multiples of a set distance around the leader line dot.
Angle snapping: snap icons to set angles around the leader line dot.
Icon alignment: snap icons in line with other icons on your plan using the blue guide lines.
Adornments
The pink plus button has been removed. Adornments are now added with the new Add Adornments button in the tool panel.
You can now import photos from the plan as adornments.
Added adornment types for lines, arrows, and basic shapes.
Added a copy and paste clipboard for adornments.
General
The Export tab now lets you bulk-export photos from any plan in the current campus.
You can now manually reorder floors in a building, from both the plans panel and the plan manager.
The orientation setting on diagrams now reflects which templates are available to choose from. If a diagram's orientation does not match its template, PlanStudio shows an error in the sign preview panel.
You can now add standalone north symbols in diagram templates outside the plan and site plan areas.
Common and tenanted zones no longer impact footprints on the site plan.
Panels can now be resized by dragging the edge. Double-click to restore a panel to its original size.
The cross-street address is now auto-filled when adding a buildings to a campus.
Users can now preview evacuation paths in read-only mode.
The nav mesh crossover mode now saves your state when you leave the tool.
Leader line dots can now be rescaled using themes.
Exit signs can now be theme-tagged.
Evacuation diagrams with a YAH (You Are Here) are now automatically framed so the YAH is always visible by default.
Hotkey improvements.
General UI enhancements.
Improved security.
Improved offline mode reliability.
Cleaned up the photo UI to work consistently across Export Menu, Plan Summary, and Adornment Photo Picker.
Assembly Areas and Fixed Icons can now be hidden through the Layout Overrides.
Solved an issue causing some icons to render as a black box.
.png)